
Setting Up Traincontroller
To get the best from Traincontroller with automatic train movements, it is necessary to section the railway into blocks. With a few exceptions, a block is needed wherever a train could need to stop. A key challenge is to decide how many detectors are needed for each block.
The South Downs Railway uses entirely electrical occupancy detectors, which are triggered by a current flow in the track. The current flock can be from the locomotive, lighting decoders in "dead" ends of multiple units, or from 10K resistors on the axles of most rolling stock. The idea is: if a train, or part of a train, is in a section of track, its detector should operate. Most of our track (with the exception of terminus platforms) only runs in one direction.
If a train won't stop in a block, or its stopped position doesn't matter: you could have one detector per block. That should be connected to all of the track in the block. Traincontroller can estimate where to ramp down the speed of a train to stop it at a particular position, but it doesn't work accurately for me.
If you want to stop a train accurately at the end of the block: you will need two detectors. This might be at a terminus platform, or by a signal. One detector covers most of the block, and traincontroller ramps speed down so it is crawling at its threshold speed by the end. The second section is a short one at the end of the block and is positioned to detect the first axle. My detectors (a mix of Digitrax BDL168 and BD4) seem to have about a 1s delay before reporting "this section of track is occupied". A train will typically stop 30-50mm into the block. Most of these blocks are 130mm long but some are as short as 70mm at platform ends.
If you have a terminus platform you may need a third sensor, with one covering the approach end of the block. On SDR, a locomotive will pull a plain to a terminus platform and then be trapped behind the carriages. A new locomotive will then be added onto the other end that will taker the train away. "Train tracking" allows Traincontroller to follow that new loco as it is driven around the station area as long as it can follow its progress through blocks. It seems to work well, but to know that the train has "arrived" nito the block with the carriages it needs a third sensor to light light up. Remember the carriages all have resistor wheelsets, so the main detector is already occupied.
If you have a block that can operate both ways: it will also need 3 sensors for combinations of those reasons. One detects most of the block; one detects presence at one and, and one detects presence at the other end.
Our signals are controlled by SIGM20 LocoNet signal controllers. These units work out the correct signal aspect from the block occupancy sensors, the positions of points and other signal aspects. For a manually operated train this would generally be fine. Sometimes, though, Traincontroller isn't ready to let a train go but the track ahead is clear. This could be if the exit from a block is locked, for example. Under those circumstances, it would be good to make the signal stay red until Traincontroller was ready for it to go. In Traincontroller this is indicated by a block's "block signal" being red.
A SIGM20 signal can be forced to red by settings its DCC accessory address to THROWN. When set to CLOSED, it chooses its aspect according to the track ahead. Traincontroller can cause that "make signal go red" to happen.
It's easy to do. Add a 2 aspect signal to your switchboard, and set the DCC address to the signal's DCC address. For block "green 3" the corresponding SIGM20 signal is DCC 221. Make sure the signal is configured to be green if closed, and red if thrown.
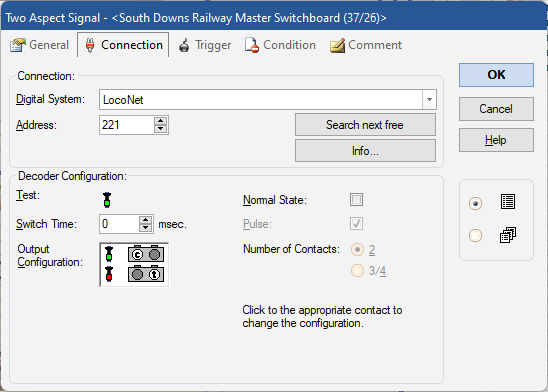
To set its state from a block signal: Set the Traincontroller aspect to be red if the accessory is thrown, and green if closed. Choose the "Trigger" tab; choose the "red" aspect. In the left window select block "green 3". In checked elements on the right, selected "checked" at the bottom, expand "main signal" and select "calculated block signal to the bottom is stop/red".
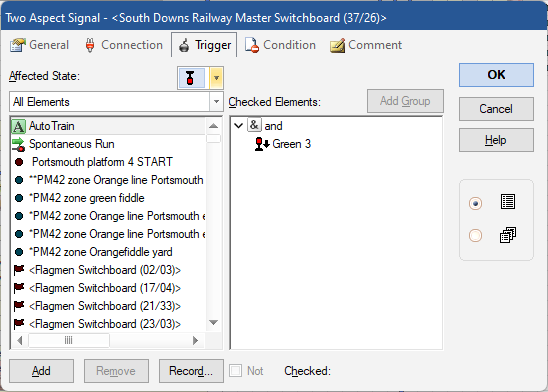
Then choose the "green" aspect, and choose the block signal you want to make it green (in this case green 3, at the downward end).
Now, that signal will be forced to red if the Traincontroller block signal is red. That's all you need to do!
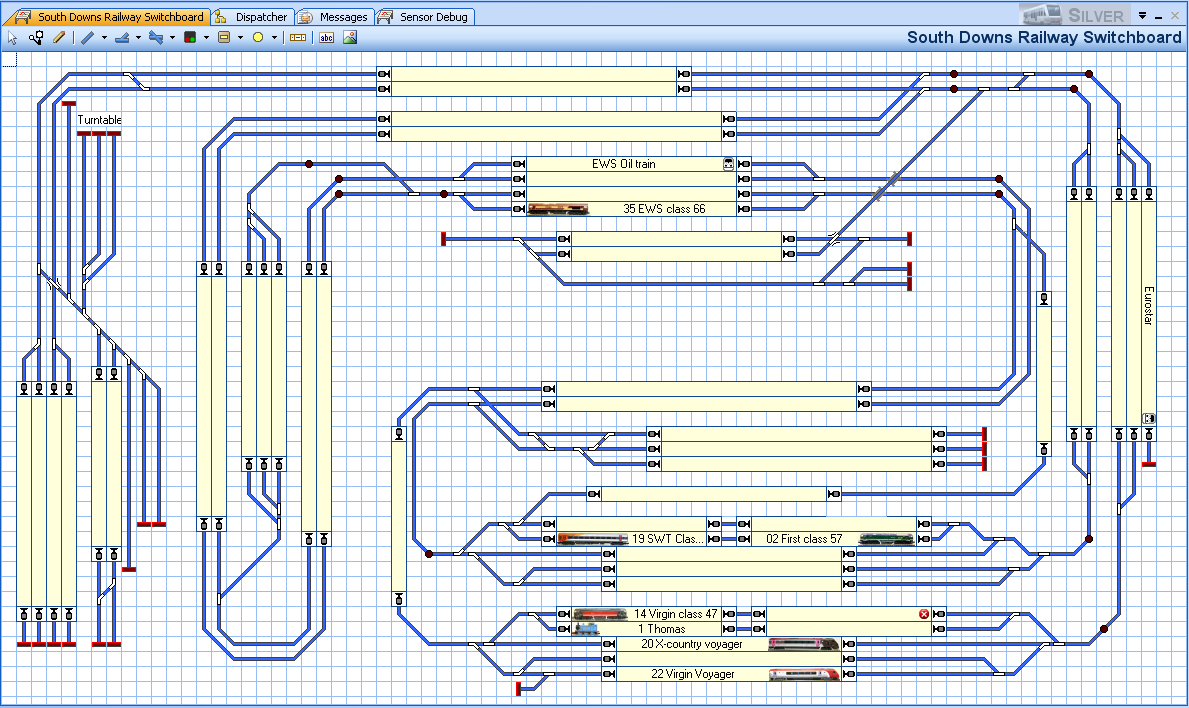
A Switchboard is the principal window for displaying your railway. You may elect to have several switchboards, or one switchboard, depending on size of railway & screen size available. (TC Bronze only allows one switchboard). The switchboard size, once drawn, is fixed: so plan it carefully!
My Switchboard (it's too large to show on screen)
Because the switchboard can't be zoomed, plan how you will use your screen space. I typically want the switchboard and the engines/trains window visible at once. Use that knowledge to work out how big you can make it.
Start by positioning the points, then the track in between them. This will give you a schematic indication of the basic railway. Set the properties for each point to assign the DCC accessory decoder number for each point, and which direction is closed/thrown. Then test it all, thoroughly!
Add the blocks to the switchboard. Blocks are needed anywhere one train might stop under automatic control; typically you would expect a signal to be at the end of each. Station platforms, roads in a goods yard and roads in fiddle yards would be blocks. Roads in a goods yard where you will be shunting do not need to include blocks. The blocks will show the train name in them, so make them big enough. 15 squares seems to be a good size. Each block will need a name, so try to use a meaningful scheme (for example being logical about platform numbers).
Use the Block Editor tab to add the contact indicators to each block. These are some kind of track sensor used to detect train presence; mine are all electrical detection. A typical block on my railway can only have trains running in one direction, so it needs two contact indicators:
- One to indicate that the block is occupied, which will be used to commence slowing a train down if it is to stop;
- One to indicate that the stop point has been reached.
Then while still in the block editor, add brake markers and stop markers. These are attached to the contact indicators and tell Traincontroller what action to take when the contact indicators become active. They are directional: my blocks only have them pointing one way or the other, but if you have bidirectional blocks you will have two sets. The Brake Marker will have a "ramp" distance which is the length on the model over which the train is to decelerate to its threshold speed if it is going to stop.
If the block is long, and you want engines only to start to slow down part way along the block, you can add an offset distance. This lets the train run at full speed until it has covered that distance. Your trains will need to have good speed profiles for that to work accurately!
It is possible to add signals and graphics to the switchboard; I haven't done that.
Unless you have TC bronze, you can have several switchboards.
How the various Traincontroller windows are used is a matter of personal preference. I have a 24" LCD screen for the railway, which is large enough to show everything on one monitor. Some people may use a smaller monitor; some may use several monitors.
I typically have the display configured as sketched here (apologies for the lack of detail but it is hard to reduce the size of this to fit!)
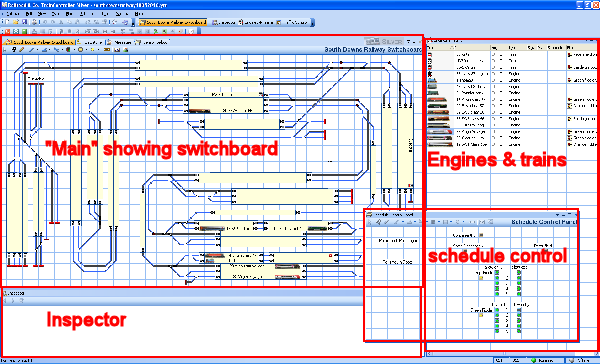
- There is a "main window" section with several tabbed windows. Only one of these is visible - choose the correct tab to show it.
- To the right is the "engines & trains" window to show the status of rolling stock.
- To the bottom is the "inspector" window used to show information about a selected item.
- Floating to the bottom right is a "schedule control" switchboard. This is used to initiate train movements.
On the main window area, one of several tabs can be selected:
- A switchboard showing all of the railway;
- A "debug switchboard" showing all of the sensors ("contact indicators") to that problems in train detection can be traced
- The "dispatcher" window used to show & select schedules, and track reserved by schedules
- The "message" window used to show messages from Traincontroller, to work out what might be causing problems.
- The "timetable" window to show the set of planned train movements.
Each engine that is to be controlled by Traincontroller needs to be added to the program. This is simple to do. When in edit mode, select "create engine". A new engine will be assigned in the engines & trains window. double click on it to set its properties:
- Its name will be shown both in that window and in the block it occupies in the switchboard. A short name fits better; I always begin the name with the DCC number e.g. "32 Eurostar".
- You can assign a picture of the engine - either a standard one or you can use a photo (you will need to prepare the images first using TrainAnimator). If you use a photo, taka it with the engine facing to the right.
- You can enter the length of the model - this can be useful for advanced operations e.g. positioning where a train stops.
- You can enter its weight and power - used for calculating top speed and acceleration.
- Its DCC number is entered on the "connection" tab. "Digital System" chooses the DCC system that controls the trains - mine says "LocoNet" because I have a Digitrax system. If you don't have transponding, put "without connection" for detection. You do not need to have transponding for Traincontroller to work effectively!
- On the "speed" tab you can assign max speeds both forwards and backwards, and accelerations. It is recommended to set DCC acceleration & deceleration CV values to 0 and let Traincontroller work it out.
- On the "Functions" tab you can set what DCC functions are available - typically lighting and sound.
- The "resources" tab is for those keen on reality simulation: set a loco to "coal" and then don't refill it with coal, and it will eventually run out & stop. Mine are set to "electric" to avoid that.