
Controlling Trains
After following the steps so far, Traincontroller is ready to control trains. The "Autotrain" feature can be used with no new information being needed.
- Make sure you are not in edit mode;
- Drag engines from the "engines & trains" window to the blocks they are in;
- Click the "Autotrain by drag & drop" button;
- Drag a train from one block to another
- ...and Traincontroller will drive the train to that destination.
AutoTrain provides a basic way to move trains around. I use it particularly to recover from things that have gone wrong (e.g. derailments) to put trains back to where they should be.
The next level up is to use Schedules. A Schedule can be considered a "recipe" to move a train from one location to another (or back to the place it started). It is more capable that the "autotrain" method, in that you can specify several possible paths. For example you can specify both possible paths through a track loop; if one path is already occupied by a train, Traincontroller will select the other one. All blocks in the fiddle yard would normally be included, for example.
You build a list of schedules, for all of the train movements required; then trigger them in several ways:
- Manually, by selecting the schedule and selecting "start"
- By having another schedule assigned as a successor of an earlier one;
- By using a timetable, to create a timed list of schedules to be run;
- By using a control panel.
A control panel is a simple switchboard with pushbuttons used to trigger schedules. This is mine (albeit not completed yet!)
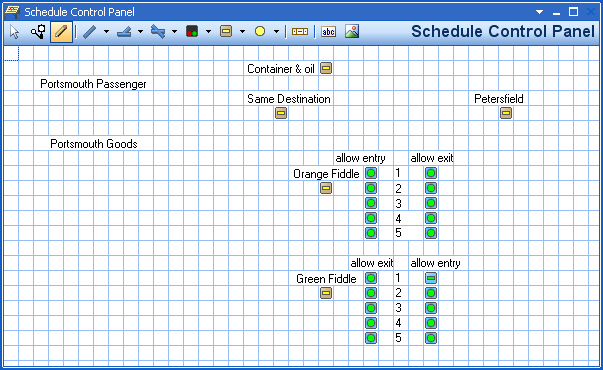
The orange buttons are used in pairs to initiate a schedule. To run a train from the green fiddle yard to the orange fiddle yard, press the "green fiddle" button then the "orange fiddle" button. The right schedule will be found, and a train will be started. For this to work, the pushbutton manes need to be allocated in the schedule's "start-dest" tab. It is important to select "direction sensitive" on the same screen, or future chaos will result.
Also included on my control panel are buttons that allow or block the entry and exit for the fiddle yard roads. That allows me to control which trian is taken by a schedule, and where a train is put.
Setting up a new schedule from scratch is surprisingly easy.
- Go into "Edit" mode.
- Select the "dispatcher" window
- Select "Create schedule" from the "schedule" menu. A new schedule will be added to the list of schedules.
- Double click on it, and give it a name.
- If you have a control panel, click "record" on the "start-dest" tab; then press the start and destination buttons on the control panel. They are picked up into the schedule definition.
- Close the properties editor.
- Select "pick from block diagram" from the "tools" menu
- Click on all of the blocks forming the route; they are added.
- If there are several blocks in passing loops that could be used - e.g. in 5 roads at the fiddle yard - select all of them.
- It is also necessary to select the routes between the blocks; click on them. Where there are overlapping routes - for example where there are complex junctions - select them from the "routes" tab in the dispatcher window.
- Right click on the start & end blocks and assign them to be start & end, with a direction assigned (depart for start block, arrive for destination).
And that's all that is necessary to make a working schedule. There are some rules that can be changed:
- "enter occupied blocks" and "enter occupied routes" should not be ticked.
- "train may stay in start block" can be ticked. If ticked, if the schedule can't start immediately (e.g. if its path is blocked) it will start when it can.
A timetable provides a way to operate a set of timed train movements, according to the fast clock. It is essentially a list of schedules to be run at certain times, with a defined repeat period (e.g. "repeat every hour").
Once the timetable is set up, it is initiated by starting the clock; simply click in the clock icon on the toolbar. It is stopped by clicking it again.
The clock can run faster than real time. To change the clock speed:
- Go into "edit" mode;
- select the clock window (if necessary view it by selecting it in the "window" menu)
- select "properties" from the "edit" menu
- From there you can set the current time, and the scale factor (i.e. how much faster than real time).