
Couplings
The Dapol couplings (and the microtrains ones before them) use magnets for uncoupling. If the coupling has no tension as it crosses the magnet, the two halves of the coupling are pulled apart and separate. The idea is, if you drive a train normally across the magnet it won't uncouple but if you reverse when over it, it will. The couplings then stay uncoupled if you push the train backwards to a final resting position.
For this to work, it needs a magnet with its North-South poles across the crack. The Peco kind of coupling magnet is no use for these. I have permanent magnets located at the end of terminus tracks where uncoupling will take place.
The Microtrains magnets are rectangular, and you need to cut away the sleepers to use them. Cut a gap, add epoxy and insert the magnet; they provide a jig to hold it in place until the adhesive has set. The Dapol magnets are similar, but I think a little narrower. Great on a straight track, but a problem on a curve where cutting away the sleepers might affect track geometry.
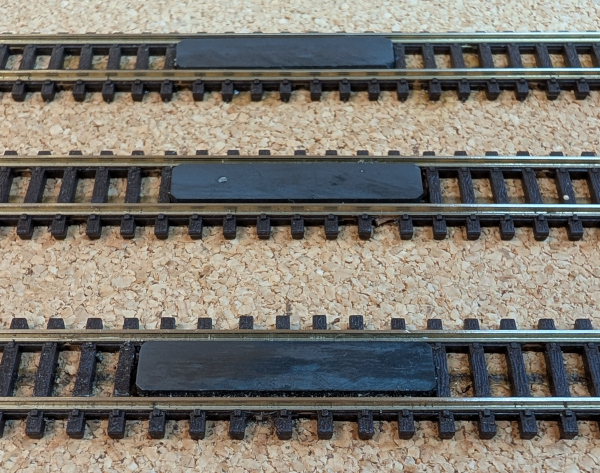
I have found what seems to be a viable alternative. This uses small 3mm round magnets which fit between the sleepers. With a string of magnets equal to the track gap (ie it just fills the space available) it is powerful enough to operate the couplings. 5 or 6 such strings provides a magnet long enough that you don't have to hunt for it. These magnets are readily available and very powerful. Look for 3mm diameter Neodymium magnets which are available in 1mm, 2mm and 3mm lengths. A 7mm overall length is needed; that could be 7 1mm magnets or 3x2mm magnets with a 1mm magnet at the end. Aim to get all the "north" poles at the same end: you want the ends along one rail all to be trying to repel each other.
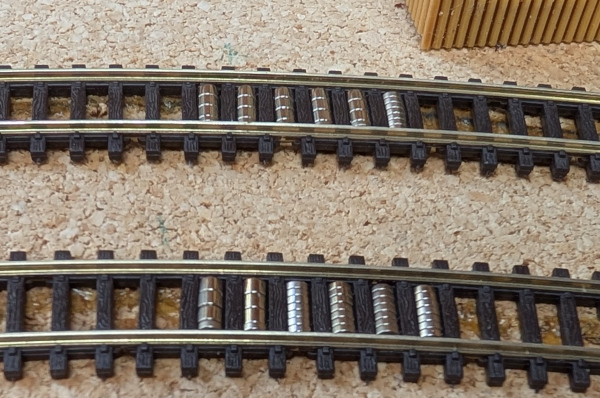
In the diagram you see uncoupling magnets on a bend; they seem to work fine. I plan to put a piece of plasticard over the top that appears to be wooden boarding as if it was a barrow crossing.
There's useful advice available on the internet about fitting the Dapol NEM coupling pocket conversions to various N scale rolling stock. It seems you just need to be brave!
http://www.modelrailforum.com/forums/index.php?showtopic=25799
and here...
What's not totally clear is how to gauge the distance to set the pocket from the buffer beam. The Dapol kit gives you a jig which is OK if you are glueing a pocket onto a simple body. Bogie conversions aren't so simple! Most of my conversions have resulted in a long coupling distance... but in fairness, not too different from what the Rapido couplers provided in the first place. There are short versions of the couplings available - I may need to dabble with that eventually.
I've converted the bogies for the bogie oil tanker train and container train. The bogies design was identical. Simply cut off the old pocket, leaving the rear vertical plastic part; then glue the Dapol pocket conversion onto that with epoxy.
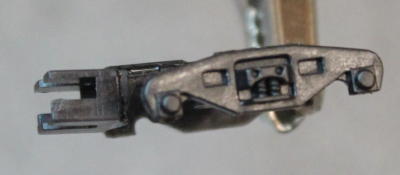
The first stage of the conversion simply fits a rectangular carrier. There is then an insert to be added. It is important to get this the right way up: it should allow the coupling to bend upwards (for which it has a tiny strip of nylon as a "spring") but not allow it to bend downwards. It it bends down, it will snag onto the uncoupling magnets.
I had started to use Micro-trains couplers. However, Both Dapol and Bachmann announced similar looking couplers that fit into NEM pockets that seem to be fitted to most new rolling stock. So it made sense to give them a try!
Bachmann, despite announding they would produce something, seem not to have released any couplers. Micro-trains had apparently indicated they would produce an NEM pocket variant, but that seems not to have materialised. However the Dapol variant is now readily available and seems to be supplied with many models when new. In principle, the Dapol couplers should work with either manufacturer since the NEW pockets should be standardised.
The Dapol coupler is physically larger than the Micro-trains, and is designed to be fitted at lower height. The two are NOT inter-operable: this means you should not expect them to couple together. I had already found that the Micro-trains product couldn't be fitted to UK rolling stock at the "correct" height because it fouled the buffer beams so I'd set about using a lower height standard. The Dapol ones are lower still. (Perhaps the height issue is why Micro-trains have not released something??)
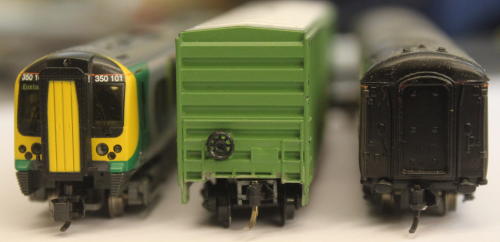
Not the best picture in the world, but here are three couplers:
Left - the new Dapol magnetic coupler fitted to a Bachmann model
Middle - a Micro-trains coupler on a Micro-trains US model
Right - a Micro-trains coupler fitted to a Bachmann model at lower height.
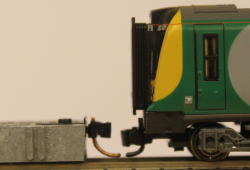 |
Here's a picture of the new Dapol coupler alongside my modified Micro-trains height gauge (which was already lower than the standard height). The difference is clear (the coupler on tihs model may be drooping slightly, but nevertheless there is a clear difference). |
Dapol also supply NEM conversion kits to add NEM pockets to non NEM chasiss models. That means almost all of mine. I'll look next at how effective those conversions are. Given that essentially all new models have the pockets, this does seem to be the way to go.
For tests I have a pack of medium shank couplers. When fitted to the class 350 "Desiro" model the train will easily go round my smallest radius bend (just under 300mm radius). This suggests that the long shank couplers won't be needed. Operationally, they seem to function similarly to the Micro-trains ones when run over a Micro-trains magnet on a test track; I haven't done any "proper" testing.
fit to old models so surgery is needed. Eventually I'll publish a step-by-step guide, but I only have photos of the first "completed" conversions so far: I didn't know what I was going to do until I'd done it!
The Dapol conversion kit consists of a relatively large box, which you are supposed to glue onto a model; a special insert is then plugged in which makes the NEM pocket. It's the insert that is the NEM sized item; the box is simply a carrier. The conversion kit includes a jig and instructions, which make sense for things like simple wagons but not for locomotives and bogie stock.
|
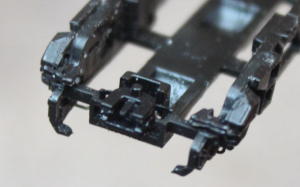
The bogies easily click out, and are in two pieces. the lower part is a decorative frame. the Rapido couplers are mounted in non-standard pockets which are formed from both halves of the bogie. . Using the Dapol height gauge, the correct height for the insert was level with the bottom of the old coupling pocket on the clip-on bogie frame. Pop off the lower frame, and use a scalpel to widen the hole at the front: you are after a hole almost as wide as the two prongs that mount the frame to the bogie. Then use a 1mm drill to drill a hole to mount the NEM pocket so it is just forward of the bogie frame. Use superglue to stick it into place. The main part of the bogie houses the top of the old coupling pocket. The front of the aperture needs to be widened. It may turn out to be a good idea to insert a small "shim" above the NEM conversion to prevent vertical motion. |
 |
| The next to be changed was a Mk 3 carriage bogie. The correct height for the NEM insert is flush with the BOTTOM of the original bogie frame. I simply cut away a hole big enough to house the insert, then cut the top wall from the Dapol rectangular box and glued the insert to it. That provides a plastic "plate" with the insert attached; simply glue it to the bottom of the bogie body. | 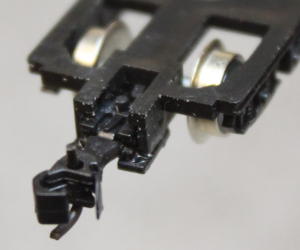 |
Here's the finished product on the carriage!

So far I've used the medium length couplings. It appears I may need shorter ones: the coupled distance is currently quite big. I'm hot sure shorter couplers will clear the buffers, so more research is needed.
Almost all "N" gauge rolling stock is fitted with the "Rapido" coupler. This is what most Dapol, Graham Farish and Peco models will have as standard. (Some multiple-unit models that are intended to stay as a rake have different couplers as standard; they aren't designed to inter-mate with anything else).
There are actually two variants of the Rapido-type coupler. The version supplied by Dapol and Graham Farish has a small spring to return the coupler to the centre. The "ELC" version supplied by Peco does not have a spring, and it ifs free to lift vertically. Both of these couplers mate with each other.
To uncouple both of these types, a movable "ramp" can be installed into the track. This needs to lift to uncouple, and lower down to allow trainst to pass normally. For example the Peco SL-330 module does this; it can be operated manually or by using a point motor. Then in the raised position, the arm on the bottom of the coupler is pushed up, and the couplers lift and and are allowed to separate.
There is an alternative magnetic method to uncouple the Peco ELC style couplers. This has a small strip of iron mounted to hang down below the coupling. When an electromagnet under the track is activated, this iron strip causes the coupling to lift up.
My experience with these couplers has been as follows.
- When coupled, the "return spring" type will stay coupled. A train can reliably be driven round the railway and it will never break apart.
- It is quite hard to couple them together if the train is on a curve.
- The Peco ELC variant have been prone to uncoupling themselves on my railway.
Either uncoupling method does not permit subsequent shunting while preventing a "recoupling" from occurring. That means an uncoupler will be needed in every spot where a coupling needs to be split. At the end of a terminus station platform, that isn't a problem; in a shunting goods yard it may be more of one.