
New reports
Tony and I had another operating weekend in February. The principal purpose this time was to "catch up" on schedules for operating the newer areas of the railway.
I'd completed the engine shed area in preparation, including installing the turntable. Finally we could work out how the "steam excursion" trains would be operated. I've described the details in the "operations" section, but much of the effort was planning how the "train sets" feature of Traincontroller would be used.
If you have rolling stock that is sometimes operated joined to other stock but sometimes on its own, you can use "train sets" to manage them. For example a rake of coaches can be coupled to a locomotive, but the locomotive can also be driven on its own into an engine shed. Traincontroller lets you join and separate elements to create a train, then break it up into its parts when the carriages are put back into a siding for example.
In most cases "joins" are done automatically, using "join by train tracking". This requires detection sections where a loco will enter a block that's occupied by carriages, so that it knows the train has entered the same block. When the loco speed is reduced to zero the two become joined together. At the end of a main line schedule at a terminus, the schedules are programmed to separate the engine; the only steps then needed are those to put the carriages back into the engine shed.
We can now operate a small goods loco to the factory siding at Clanfield. The siding has its own block, and the very end has another small block for a class 08 shunter. We needed to add 4 new detection sections at Clanfield, for which I'd pre-installed a BD4. The point at the entrance to the platform is now a "start" sensor for the platform's block. The factory siding has 3 detectors: one for the majority of its length; one at the very far end where a shunter will sit; and a short one between the shunter and the majority of the length. The latter is so that the shunter entering the siding's block can be detected, so an auto join can happen.
We've also planned for the control panel needed for Portsmouth. there will need to be some pushbuttons for manual separate and join operations - all of which we worked out by testing the sequence of events.
The shops in Clanfield were fitted with LED lights, but I'd never got round to connecting them up. Embarassment finally kicked in.
The lights are controlled by CML Electronics MSC8 scenery decoders. These have a lighting sequence that makes the lights go on and off periodically, so the houses and shops look occupied. I've mounted the MSC8 units into the same bakelite boxes that mains power sockets use: a double wall box fits an MSC8 nicely. The boxes are munted behind the backscene, ie very near where the wires come through from the models.
To get an acceptable brightness I have added 3K9 series resistors at the MSC8 end. As far as I recall there was already a 1K resistor inside each house in series with two white LEDs; put bluntly they were too bright. Now, we get acceptable brightness with an estimated forward current of approx 1.5mA through the two series LEDs.
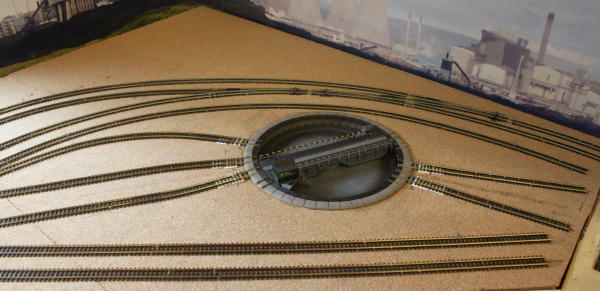
At last, the final pieces of track have been laid! All of the points feeding the turntable/engine shed area were laid before Christmas 2015, but the turntable itself still needed to go in before the tracks around it could be added.
We have a Fleischmann 9152C turntable. This needs to be sunk into the baseboard, to a depth of around 8mm deeper than the plywood and cork. By chance, there were two sets fo supporting timbers under the turntable that have had to be cut away. Most of the plywood cuts were simple using a jigsaw; the bits above the softwood supports, and cutting the supports themselves, was done with an "oscillating saw" tool whose blade vibrates but doesn't rotate. The trick is to not press hard - doing so stops the vibrating action. The softwood in particular was really easy to cut that way.
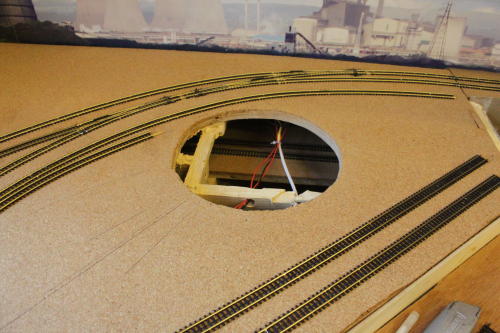
Mounting the turntable itself is easy: impact adhesive holds it into place. Joining the tracks wasn't so simple. It's well documented that neither Peco nor Fleischmann fishplates inter-mate with each other. The reason is that the Fleischmann track has a "flat bottom" profile with an very wide flat base, and the Peco code 55 track has a very bulbous centre section. As usual, after you've completed the job you discover the right solution...
Initially I set about using the Peco nylon fishplates to join the tracks; those stretched onto the Fleischmann track OK. However they also dislodged easily while trying to mate the Peco track onto them - not good with a clock ticking for the Evo-Stik glue to set.
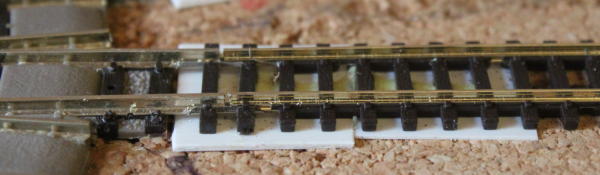
The solution came to me at the end: use a Dremel tool plus grinding stone to grind a little off each side of the Fleischmann track flat bottom. I'd removed about 5mm of plastic base from the Fleischmann rail joiners to give access for fishplates. (See the "before" and "after" picture below). You can then fit a Peco fishplate with a bit of pressure applied. The rails join at almost identical top positions, but the peco sleepers are approx 1mm above the baseboard.

The Peco track was laid onto a 1mm plastic "spacer" then a 0.5mm spacer to step down the height above the baseboard. As usual the track was glued down, and seems to be stable.
Finally I've modified the bridge to remove the spring contacts from the bridge track to the exit rails. Each exit rail has its power fed directly; those contacts would only cause shorts as the turntable moved. I also bypassed the relay that isolates a short length of track at each end of the turntable (I used two solder bridges between relay pins marked on the photographs)
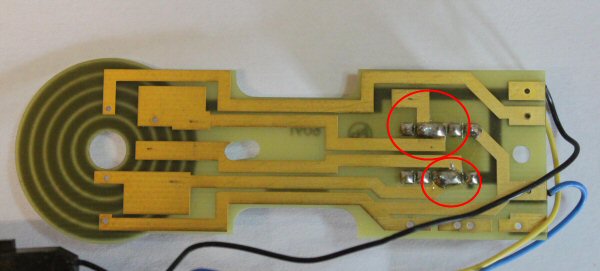
The turntable is powered and controlled by a CML Electronics TXC1 controller, mounted under the baseboard. It indexes automatically to the next track position and skips unoccupied tracks. It's set to use DCC base address 401, and address 451 for computer control.
The remote knob and display have been integrated into a DTM30 control panel.
November 2015: finally the last point has been laid. It must be nearly 10 years since I started.....
We completed the Portsmouth Station area in March. That just left the goods Yard to go, and the access point from the main line was already there. So with an operating weekend set for mid November, I thought I'd get going again in mid October and got the first few points down. Then the operating weekend was cancelled, so I slowed down.... then with around 3 days notice it was back on so I had to get on again! A mammoth session from 3pm Friday to 5pm Saturday saw the last point laid; all the point motors added; the point motors wired to DAC20; and all the power wiring to the BDL168 completed and tested. Now we have just the turntable, carriage sidings & engine shed to go.
The 3 tracks through the container yard use 3 way points. They are the first (and last) of them I've used. The good feature is: they are inherently made "DCC friendly" with carefully placed isolating sections. The slightly less good feature is: some pieces fo track can only get power through the sitch blades. I thought I'd found those and added wired power feeds, but discovered a need for two more after laying them. Oops.
traincontroller now has access to its last 3 blocks where it can send and receive trains. The track got well tested the same evening, and seems to be robust. We've worked out some logic and rationale for the goods train movements, and sketched that out in the "operations" section of this website. Welaos worked out some more "how to drive traincontroller" issues - getting the hang of schedule sequences to make a trian visit one loction, conduct 5 laps of the railway then return. It had to be possible!
My friend Tony and I had a railway weekend 6-8 March. I'd recently laid a new area of track for Portsmouth station, and it needed to be brought to life. We were able to make substantial progress on a number of fronts?
- We established a working, automatic way to join and separate locomotives at terminus stations. That's important for Portsmouth and the Eastleigh oil depot. (There's a traincontroller tip written for that).
- We discovered schedule sequences (another tip): these are essentially a set of schedules execute one after the other with the same locomotive.
- All the Portsmouth track was tested and debugged. I had to change one track feed, to improve train tracking, and add "start" sensors to each platform to allow trains to be tracked into an occupied platform for joining a new locomotive.
- Added uncoupling magnets on the Portsmouth platforms, and on Clanfield platform 1 (which will get short goods trains).
- Where sequences loop to create activity, Tony added some randomness to when the train stops at Petersfield (the "through" station).
Along the way several things decided to stop working. We have only one "Cobalt" point motor on the railway, in a location where access is difficult... and it failed. We took it apart and found the motor seemed to run OK, and put it back together and it seemed to work again but it wa failed again by mid morning on Saturday. Luckily I was able to get another one locally to replace it. We also had a normally reliable loco indicating a track short as soon as it was moved from zero speed.... in the end I removed the DCC decoder and powered it up from a 12v power supply. after a moment of taking over an amp it cleared itself and started running normally. Often this has turnout out to be a cracked gear in the bogie - but this more wouldn't run with both bogies removed. Interesting.
All in all a very productive and enjoyable weekend.... need to lay more track and construct scenery before I'm ready for the next one now!