
New reports
It seems there's been no progress since the last railway weekend, a good 6 months ago. Oh well.
This weekend we've put all of the effort into two apparently simple projects:
- Adding more backscenes behind Eastleigh and the first part of Portsmouth
- Adding a working level crossing.
The backscenes were quite simple. We use the Gaugemaster 12" high backscenes. A new complication though was a need to match the horizon height in a corner, and a need to join two completely different backscenes on a 15' run. The former wasn't too hard: we were able to get it roughly right, and there was already some trees in the corner on one wall. We then cut out trees from another backscene and superimposed them onto the second backscene. The result: a very nice clean join. The join from a rural backscene into an industrial one is a bit more abrupt: I suspect that a similar approach - harvesting a picture of a building or tree that can be superimposed - may be needed.
The level crossing took two days: I'm not at all sure where the time went. More details in this article.
At the end of all this: the railway now looks more the part, simply because of the backscenes. We've done some essential planning for how the corner between Petersfield and Eastleigh will develop, and added an animated scenery item. The general idea is, now I know how to do that I can go on to do more on my own....
Finally - a weekend working on the railway. The plan this time was train operations: no more scenery work. My friend Tony Ellary visited and over 3 days we've made a lot of progress setting up more Traincontroller operations.
- We worked out how to interlock a DTM30 with Traincontroller: there's a note in the "tips and tricks" section.
- We reconfigured some of the short tracks in the fiddle yard. Three of the 4 roads that can take two short trains will now take trains up to 64cm long: sufficient for the "voyager" trains.
- I finished the remaining coupler conversions from Microtrains to Dapol magnetic in NEM pockets.
- We've set up a load more schedules for Clanfield and the new Easteigh depot
- Various "fixes" to logical errors in the way I'd configured Traincontroller
- Re-did all the loco speed profiling (version 8 uses a different approach)
- Set up some three sets (a dreadful name!)
- Caught up with the loco photograps for Train Animator
- Fixed the Eurostar, which wasn't properly driving both bogies: the driveshaft at one end of the motor was only just contacting the hexagonal holes in the motor flywheels. The solution was to move the driveshaft back a bit at the bogie end.
I think that will be it for a while!
For the first time in a long time, we've laid new track. The oil depot "Eastleigh" has been waiting a while. So finally I got started, and pretty quickly the track was complete.
It's not a huge area: 5 points plus a double slip, plus track. The "new" feature was track crossing a gap onto the lift-up panel (the whole depot can be hinged up for access to the track below).

There are several distinct phases in my style of track laying:
- Lay the track, with dropper wires for power to each track section
- Add insulating sleeving and crimp bullet connectors onto the power droppers
- Add the power feeds. Most of the depot doesn't have block occupancy, so there aren't many distinct power feeds.
- Add and test the point motors
- Connect the DAC20 accessory decoder (which is mounted under the hinge-up panel).
We've also added a DTM30 panel to control points in the depot: most will be operated by hand. Operations will consist of taking the loco from the fron of an arrived train, then running it around and back on to the front of a train so it can depart again.
A lot of work after Christmas 2013 has seen Clanfield evolve. When you lay track, a few hours work produces impressive results; it seems that a few hours work on scenery makes almost no visible difference in comparison!
At the rear is the hill complete with working windmill. The village chuch is next to the terminus station, and we are in the process if adding gravestones in the churchyard. A row of semi-detached shops adons the backscene; there are terraced houses still to come. As you can see, there is work still to do in front of the station platform - sheep will eventually graze there.
all the buildings have working lights: while LEDs are controlled by CML Electronics MSC8 Scenery animators. When activated, the lights turn on and off automatically at pseudo-random points to make the buildings look occupied. The MSC8 also controls the windmill motor.
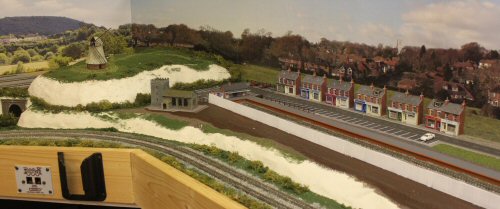
Looking out from Clanfield station, there is a fire station then a small small industrial area. we've added fencing since the photo was taken. The factory has a loading bay with a siding from one of Clanfield's platforms. the loading bay has a platform with a central loading ramp; we've added a brick rear wall onto the basic Peco kit.
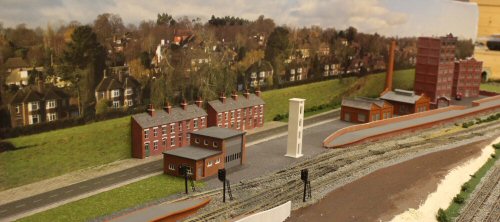
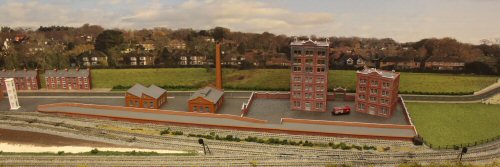
The factory is made from a Faller kit. All buildings have lights, again controlled by an MSC8. The tall building has a fire, controlled by the MSC8. Approximately every 5 minutes, a smoke generator is activated and red and yellow LEDs in the top floors flicker to simulate a fire. The fire engine will eventually have flashing lights and possibly a lifting ladder.
You can see the pictures full size using the photograph browser in the right column
We have the Tomix track cleaning cars. we've been having to switch them on and off manually as the train runs. What was needed was a DCC decoder, but done how? There is actually a "plug and play" PCB upgrade available that takes a 6 pin plug-in decoder, but it didn't look too hard by hand.
The motor has a true stall current on about 1.2A, BUT the body of the cleaner also has a self-resetting 0.25A fuse. So the continuous current shouldn't exceed that value.
A locomotive decoder with the same DCC number as its pulling locomotive was one option. With speed profiles, I could make it ramp the cleaner motor speed from nothing to full speed as soom as the loco moves. But in the cupboard I had an accessory-only decoder without a home. It's a Lenz LF100XF with 4 functions; two are rated at 300mA which is probably high enough.
Not a difficult install: I've actually put the decoder in the dust bay, taking up tiny space and not obstructing the airflow. It runs on Function1; give it the same DCC address as the hauling loco, then press F1 when the train starts up.
What's not so simple is having Traincontroller do that automatically when the train starts. You can make that happen on a particular schedule, but not on any action of the loco. Watch this space!