
New reports
OK, I admit it, no progress for a long time.... too much time spent on the Electronics to blame, plus uncertainty as to how to start the scenics.
I was given some building kits of rmy birthday last year; that has been a trigger to get started. the website now has sections describing how we constructed the backscene, and added the start of the terrain around Clanfield. This includes cuttings alongside the main line, and a removable hill.
Clanfield station has received a design change. Previously it had three passenger tracks; possibly slightly overspecified. One of these is not an access track for a goods spur, down into a factory complex away from Clanfield. This will be just a single track allowing goods to be delivered and taken away. I have the factory building; we'll probably call in "Gales Brewery" even though it doesn't look much like the real thing.
I've never constructed a building kit before. I have a few Metcalfe cardboard kits; these are very well detailed. I am constructing low relief shops at the moment for the Clanfield area. we'll try to make the fronts look more like real shops in the village.
There is a need for more electronics for scenery: to turn lights on and off in buildings at set times, and operate motors. A new DCC decoder for this is on its way from CML.
The railway comes to town! Overnight the residents of Clanfield have awoken to find a new terminus station for their village. They were disappointed however to find that the power cables had not been laid, so trains could not come to the station yet!
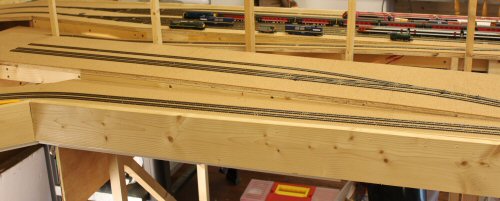
After about a 2 year absence - during which we worked out how to power and control the railway - more track has been put down. The "Clanfield" terminus station only took a day to lay the track (3 platforms, 5 points). The dropper wires are all insulated and terminated with crimp connectors; the next item on the agenda is the point motors, then the feeder wires. All the electronics is already in place, so very little "infrastructure" work is needed.
The biggest headache was actually printing the wire labels. I have a sheet of clear sticky labels with a white panel; the idea is that you laser print the markings required onto a whole sheet at a time I duly created a page of labels, put the sheet into the manual feed on the printer and selected "print"... and forgot to tell the printer that it was handling labels, not paper. It shot the page in very quickly, depositing plastic labels all over the inside of the printer as it went. In sorting out the mess, I made a larger one with a pool of toner appearing on the floor... oops.
The wiring followed what is now a well established process. All the electronics was already in place; it was simply a case of putting crimp connectors on the track dropper wires, then connecting up.
The one deviation from "normal" is that I decided to use Tortoise point motors for this station. I've had some issues with Seep motors (notably the switch on the PCB sometimes not making contact). The Tortoise is physically much larger, and of course a lot more expensive - but this was an opportunity to give them a go. The wiring section has some notes about installing them.
Slightly old news now: but we replaced the railway website with a totally new one a few weeks ago. It has resulted in continual "tinkering" since then, but apart from a thorough spell check it is nearly up to date.
The previous website was a "flat file" website created the "standard" way with HTML pages. I'd used a "WYSIWYG" editor to create the pages, but no more automation than that. It works OK; but there are some problems:
- Every time you want to add a new page, you also need to add links to that page
- If you want to change the appearance, you need to change every file.
There are technology solutions to those, but I didn't have access to the first or the web design ability to do the second.
I came across a different way of creating websites around a year and a half ago: it is called a "Content Management System" (CMS). The CMS approach is different: you describe the website content (i.e. pages of text like this) and its appearance (colour, layout, graphics, menus etc) quite separate from each other. When you click on a link to a page, a computer program creates the HTML that is then sent to your browser; behind the scenes there is a complex program running, and the content is held in a database.
I've used a free Content Management System called "Joomla!". This is compatible with most hosting environments, and is user friendly to work with. It is well supported by its community; there is help available, there are books that explain how to work with it. Critically there are loads of add-on software modules - both paid for and free of charge. By using Joomla! I've been able to create a site with (almost) all the elements I needed.
One of the consequences of using Joomla! is that you don't need any tools installed on the PC other than a live web browser. All editing is done within the web browser environment. So if I want to add or edit a page, I can do so from any computer anywhere around the world as long as it has a live Internet connection.
What's the benefit? Well, look at my table of block sensors. I used to keep this on a spreadsheet. When I was in the railway room, I could read the spreadsheet but if I found an error all I could do was mark it up with a pencil. Although a copy of that spreadsheet was on the web page, I couldn't change that copy easily. Now, I can use the spreadsheet "live" in the railway room; if I find an error I can fix it there and then. No multiple sources of data, hence no question of "which is most up to date".
I took the opportunity to update a lot of the content when the site was recreated. The section on computer control was written from scratch for the first time; now it tells what I want to achieve, if not yet how it has all been done.
It seems that progress only gets made very infrequently - and usually after I've had a visitor explain to me how to do something. This month Tony Ellary has visited me, and among other things instructed me in the arts of installing Micro-trains couplings. Tony models in "Z" gauge and is known for installing decoders in his entire fleet of Z gauge models before the days of "plug & play". Adding couplings into such large models as "N" gauge must seem simple by comparison!
Why was this a problem? Well so far I've put in the "mail line" on the railway. Nothing will ever couple or uncouple there. All the remaining areas could have coupling and uncoupling, so I needed to know what the technology would be. I've liked the magnetically operated Micro-trains couplings after seeing the Kadee "OO" gauge version, but I didn't know where to start.
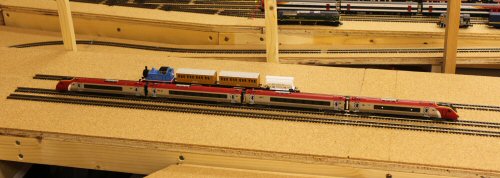
After a day we had a loco successfully pulling a rake of coaches with Micro-Trains couples installed at the end of the rake and on one bogie of the loco. It isn't trivial, but isn't fiendishly difficult either. I had prepared in advance, by purchasing a number of different coupling kits and the starter set. That meant I had all the tools and a useful range of couplings to begin with. There is a conversion set designed for "Rapido" coupler pockets, and that seems to have worked well with a simple modification: I need to make the couplings lower than the "standard" height settings, and I needed to mount it slightly lower in the pocket.
From this point it isn't now as daunting as I'd convinced myself to convert the entire railway. The plan is to leave the "standard" couplings in place within fixed rakes, and only add Micro-Trains couplings at the ends. Goods trains that need to be broken up will need then for each wagon.