
Backscenes
The backscene is a harsh transition from the model to an image. I've used Gaugemaster backscenes, which are 9 feet long.... but my longest backscene needs to be 15 feet. The heights of the horizon aren't compatible across the available backscenes; I've ended up with a harsh transition from a rural scene to a steelworks.
To break it up a bit, I've added trees in front of the backscene. These substantially soften the transition from one to the other. The challenge is, this is close to the rails.

I've used Faller 181464 N scale fir trees; these have plastic fibre "bristles" for the foliage. Some of the "fronds" reach out far enough to push N scale carriages over... leaves on the line maybe? they cut with scissors, but that was becoming tedious. The simple solution? Use hair clippers. Truly multifunction.

Any model railway "world" has to end somewhere. A backscene gives it a way to end with an image that is in keeping with the rest of the railway.
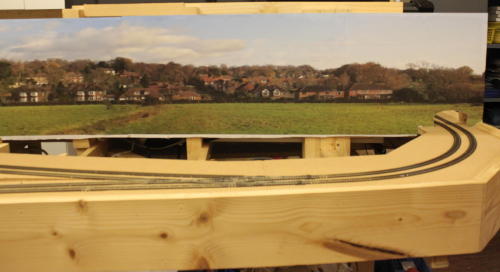
Our first backscene is behind Clanfield station and separates the railway "main" from the fiddle yard. There had been a raised panel at one end for a while, on the reverse of which is mounted the PC and display. To put in a backscene, I simply added small timber uprights every foot (30cm) or so then added a hardboard front. The hardboard was glued & screwed to the uprights, and is approximately 12 inches long. The scene gentle curves at each end.
Where should the image come from? Well I'm a beginner at this, so a ready made product was appropriate. I'm not at all artistic, so painting my own was a non starter. (Remember I'm the one who, in art classes, was told off for painting the walls of the classroom in magnolia..) What I needed was an image 10' long (approx 3m) x 1' high. Gaugemaster have introduced a range of scenic products, and have a range of backscenes. The village backscene was exactly the effect needed, but was only 9' long. Unfortunately, the other backscenes they do have different horizon heights. Adding the start of another village onto the end seemed to be the best thing to do.
The backscene comes in three strips. Each was glued in place, using a spray glue such as can be used for photo mounting. Unfortunately it has a tendency to go everywhere, and once glued on the edges have to be protected using masking tape when the next is sprayed. the glue doesn't have "give" so get it right first time!
The track enters and exits the railway through the backscene. I've simply added tunnel portals. At one end of the railway, there will be raised terrain so it won't look entirely inappropriate. On the picture above it may look a little out of place. A bridge or something else could still be credible alternatives.