
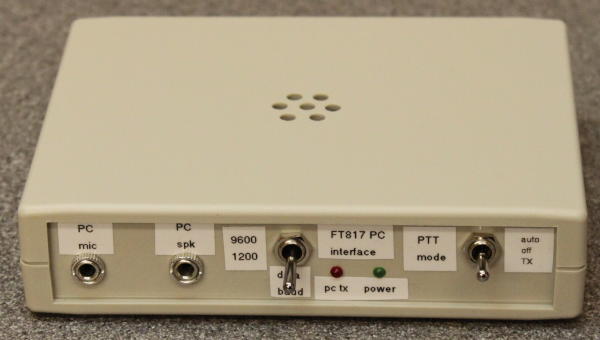
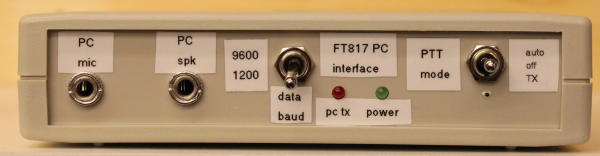
At last: I'm hoping I got this right!
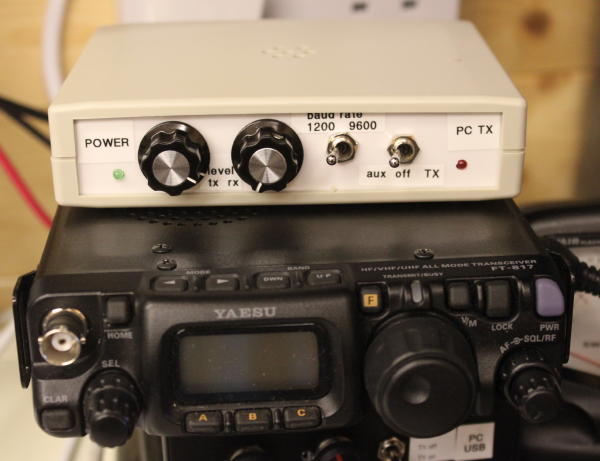
Some history: the FT817 is great for operation with a PC and laptop, but does need an interface. You'll find the mark 1 version of my interface on this website. It was a straightforward CAT interface with a USB-to-serial adapter plugged into the back; and it provided a simple transformer coupled audio interface for AFSK, with jack plugs to go to the laptop microphone and speaker connections. This worked OK, but when we got the FT450 we decided some improvements would be needed. We used an internal USB hub, two USB-to-serial ports and USB audio "stick". The new interface allowed the PTT and the CAT data connection to be on separate COM ports, which is good if they are operated by different PC programs (e.g. Ham Radio Deluxe for CAT and Digital Master 780 for PTT). We also added front panel level controls. A better interface, but far too large.
Recently, I wanted to try WSPR. Unfortunately, my new laptop only has a single headphone/microphone socket. No problem - I had a plug-in USB audio dongle. with a couple of USB leads, I was able to get the FT817 interface running; but then I fell foul of its PTT line and CAT port being the same COM port. It was time for some redesign.
Things I wanted to achieve:
- USB hub, COM and audio interfaces in the box
- Front panel level controls
- Two COM ports to separate CAT and PTT
- Properly powered (i.e. not by a COM port line)
- Electrical isolation, as per the previous version
- .... and it should be the same box as the original interface.
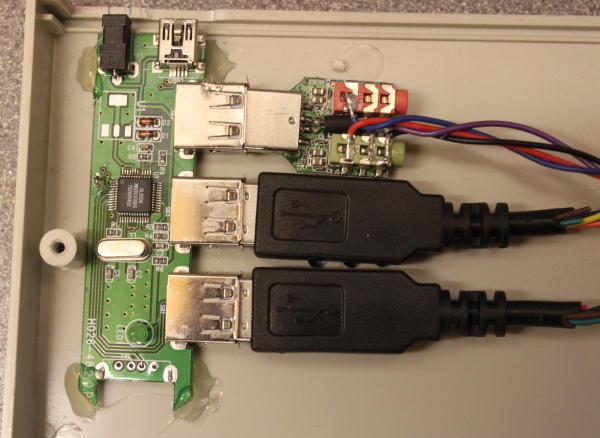
The last requirement was the biggest challenge: the old FT817 interface is about one third of the volume of the FT450 interface, that had the right features. But the interface has got to fit in with what is a small radio, or it just looks daft. Eventually I realised that if I took the USB hub and audio dongles out of their plastic boxes, they's fit ino the top half of the interface box. I also had two USB serial port leads with the USB interface in the USB plug, and then TTL level signals into the cable. Game on.
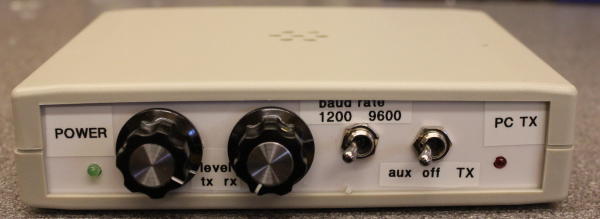
The electrical design is very much as per the original interface. Simple transformer coupling for audio, this time with front panel level controls. An optoisolator provides electrical isolation for the COM ports. This design only operates up to 9600 baud and won't work at 38400 baud: the risetime is too low.The main difference from the original is that the interface needs to provide straight through buffering rather than acting as an inverter: remember there's no TTL-to-RS232 level converters in the serial port, and those normally invert the signals. One of my USB-to-serial adapters had 3.3v logic levels: I've used two diodes as a "dropper" to make sure that a logic 1 does properly cut off the LEDs in the opto isolator.
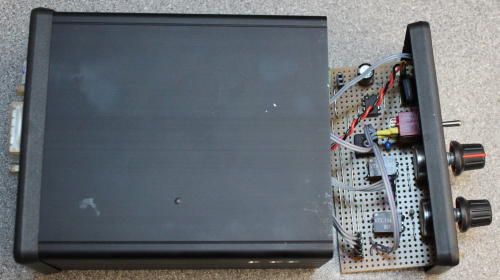
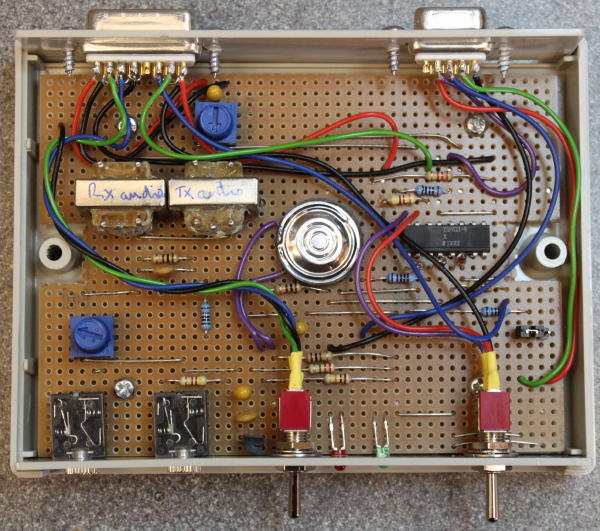
The interface is constructed on veroboard. The positioning of the components (and particularly the transformers) was awkward because of the USB interface in the lid, but worked out OK. There's actually a reasonable amount of spare space available. The TX monitor uses a small piezo speaker: the amplifier is VERY non linear so don't expect sensible audio for anything except single tone signals (e.g. PSK31): it's only there to let you know it is generating a signal!
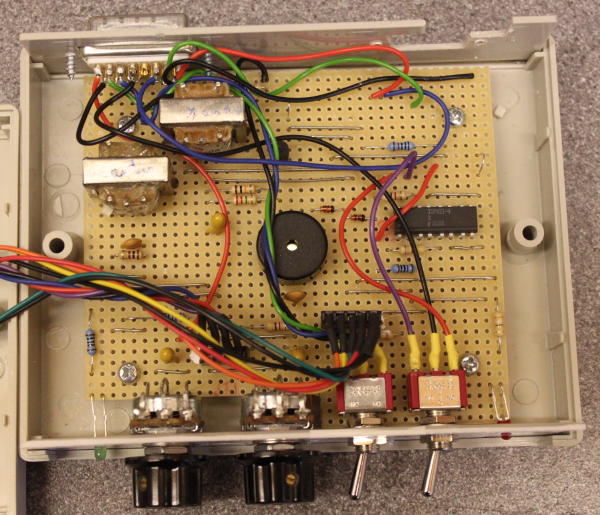
The whole was assembled and tested in a single day. The main board is quite simple. The box was too small for the potentiometers to solder onto the PCB, and flying leads were needed: if I had more time, I'd probably have used smaller trimmer resistors with a built-in mini knob, but these were all I could get on a Friday near home. The USB components were glued in place with a hot glue gun: I suspect a one way trip!
The new interface works well. I was able to generate PSK31 immediately, and WSPR once I'd worked out how to drive it. The interface is USB in, radio out so has far fewer cables than before. This time I'm proud of how much of the volume of the box I've been able to use. It would get smaller still if I put the USB hub, audio codec and serial interfaces as ICs onto a PCB - but that wouldn't have been completed in a weekend.
Configuring the PC software
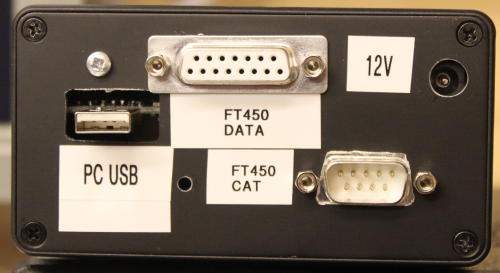
In my laptop, the com porst appear as COM5 and COM6 (other PCs will give different port assignments).
- COM6 is the CAT data port, and functions up to 9600 baud
- COM5 isn't used for datas, but its RTS when asserted operates the PTT line.
- The TX audio is "VIA USB speaker"
- The receive audio is "VIA USB microphone"
Ideally I'd like to find a way to disable the windows level controls, but haven't worked that out yet!
At last: the interface I thought I'd never finish.
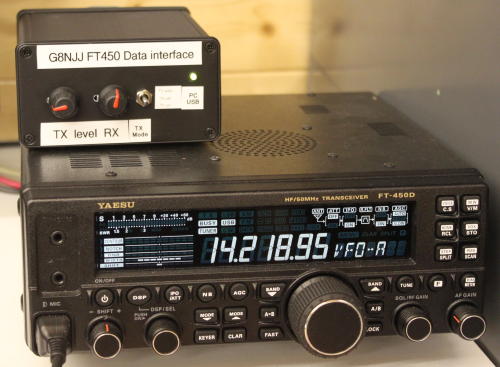
When i got the FT450 last year, I thought I'd create a CAT and data interface like the FT817 one. But I'd go a stage further, and put the USB audio interface, USB serial and a hub all in the box too. Add front panel audio level controls (which the FT817 interface should have had) and it'd be awesome.
The audio side is simple: the same transformer interface as for the FT817, just with front panel level controls now. I added a small amplifier for TX audio for monitoring the TX signal, but it does need an external 12v power feed.
The data interface was going to be all standard PC bits. So no problems... bought a cheap hub (£1), RS232 interface (~£6) and audio dongle (£1) and packaged them all up in a box. What could go wrong? As soon as I transmitted any power at all, the USB interfaces disconnected from the PC. I've spent months investigating alternative hubs, serial conenctions etc. I'v put ferrites on the USB lead. I've double checked all the earthing.
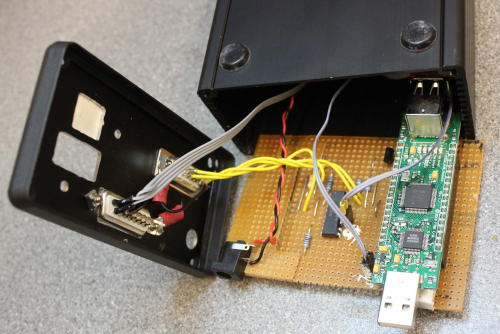
The most robust circuit was the current one. The USB hub and serial port has been replaced by an FTDI FT4232M module, that provides 4 serial ports and a built-in hub. The USB audio dongle plugs into the back of it. With that module I could TX at 25W reliably. Eventually i tracked the cause of the USB disconnection: a poor antenna earth. With a balanced antenna, I can TX at 100W without any problem at all. Get the basics right!
The FTDI module provides 4 serial ports (COM19 to COM22 on my PC). COM19 is used for the FT450 CAT connection, which works reliably at 9600 baud. COM20 is used only for its RTS signal, which when asserted enables TX for PSK31. I had previously tried VOX, which the radio supports, but "glitches" in audio caused blips of transmit. I now have the FT450 "digivox" setting turned to 0, and use the hardwired connection instead. A front panel toggle switch allows me to select between TX auto (by the RTS line), no TX at all, and TX on.
You don't need high quality audio dongles or sound cards for PSK31. A £1 one is fine. It's not the same as software defined radio, where you need high dynamic range and benefit greatly from enhanced bandwidth. I've also added a USB memory stick to store device drivers, Ham Radio Deluxe software etc.
The USB interface has a "normal" USB connector that you'd plug into a PC; but that's not normal for a peripheral in a box. It turned out cables with a socket for it are readily available albeit unusual; so the effort that would have been involved in removing the USB connector from the FTDI module and replacing it with a normal "type B" socket wasn't worthwhile.
The electronics is assembled onto two pieces of veroboard, one inserting from each end. Perversely, one is in the top of the box and one the bottom. This is view of the front of the module, showing the audio part of the interface. The 600Ω line transformers are just behind the level setting potentiometers. The toggle switch enables the PTT mode to be selected. At the top of the veroboard is a small audio amplifier to monitor the TX audio, for debugging purposes. The speaker is mounted inside the box. It works, but I needed an external 12V power connection to get enough volume to be useful; so after getting the interface working I don't use it.
This is a view of the USB interface module, and the veroboard with the opto isolator for the CAT interface. You can see the FTDI module on the right hand side; just out of sight inside the black box is the USB audio module plugged into the end of the FTDI module.
The FT817 has two interfaces for which a PC can be used. It has a "CAT" interface for remote control, and an audio data interface for various "digital" modes including PSK31 and RTTY. It is widely recommended that an interface to a PC should provide DC isolation: both to avoid noise problems, and to avoid the PC interface carry "fault" currents under various earth fault conditions.
This interface provides both connections - data audio and PC "CAT" remote control. It is fully electrically isolated. Once implemented, it has allowed me to get into the world of digital keyboard modes.
The audio side of this interface is straight from the KK7UQ design. It provides a path from the radio audio data out to PC sound card "microphone" or "line in" connectors; and it provides the reverse path from PC "speaker" or "line out" to radio data input. It uses 600 ohm audio transformers to isolate the two paths, providing complete isolation. A small buffer amplifier and speaker is provided so you can hear the "transmit" audio signal. It's about as linear as a banana, but for simple audio tones it's fine.
PTT control is provided to allow the PC to put the radio into transmit mode. This is done using control lines on a PC serial port. Most programs seem to be programmable about which lines they use, but RTS and DTR are both common. I've use a jumper so that one of these will drive PTT, and the other provides a 5v power source to the interface. My choice is to use DTR for PTT, and RTS to provide power. An opto isolator provides electrical isolation. A centre-off toggle switch allows choice between auto PTT control, PTT off or transmit.
The "data" side of the interface started life as a copy of another design from the internet. It uses optoisolators for both data paths. The design I started with had "non inverting" logic levels, and didn't work. I also had other non-isolated designs using simple transistor interfaces, which inverted the logic levels. I reconfigured how the optoisolators were used so that the signal levels did invert, and hey presto- connection established. Lesson: don't blindly copy other designs! A little more work was needed to get reliable connection at 38400 baud, but it now works well with Ham Radio Deluxe. You will need to set the radio baud rate using menu option 14.
My unit is constructed on stripboard and is mounted in a small plastic case. I've used a 15 pin D connector to connect out to the radio, with screened cables to the mini-DIN connectors.
So far I've used this on RTTY and PSK31. The audio signal to the PC needs its signal level set so that the sound card doesn't get overloaded; most digital interface programs will provide some kind of an indication of that. On transmit the TX audio level needs to be set so that ALC is not registering on the radio TX meter. For the FT817, menu 26 selects which digital mode is used.
I'm using "Digital Master 780" software which is part of the "Ham Radio Deluxe" suite. I haven't got the hang of what to type in which box yet, so it hasn't always gone well - all my doing!