The track is being laid using conventional techniques: I'm no expert in this field and I've taken a lot of advice. I'm indebted to the help given by Malcolm Alberry in convincing me to get on with it and stop worrying!
The track is laid onto 3mm cork sheet. The cork provides a flexible, sound deadening surface. The sheet is laid in the whole track area, and glued down with PVA. After the glue has set, any bumps at the joins are sanded flat.
The track plan is marked onto the cork using appropriate measuring instruments. The curves are marked using a "trammel": essentially this is a large compass with adjustable length. For "internal" bends, the centre is over the baseboard and a fixed length of string would do; for "external" bends, a tripod has been used as the centre.

The track is conventional Peco code 55 with Peco joiners and Seep point motors. The track is glued into place using "Evo Stik": this is applied from a tube, which is convenient for laying a small "bead" along the length. Strictly this is supposed to be an impact adhesive, applied to both sides and allowed to go tacky. I've ignored that, laid a wet bed of glue and put the track straight onto it; it is then workable for around 7 minutes. After the track is in the right position, it is pressed into the glue using a wallpaper seam roller then pinned down using drawing pins.
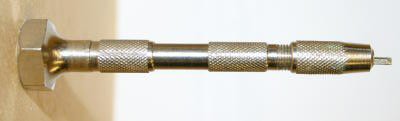
I've used conventional metal fishplates for most track joins, except for the "centre" rails at points and all joints at crossings where I used Peco nylon fishplates. The fishplates can be tight, or slack, but rarely "just right" when they are cut from the strip; also they can have burrs. A simple tool with a piece of rail with an "approach" filed onto it, then mounted in a pin vice, is an elegant solution to prepare them.
I have trouble remembering to follow simple instructions repetitively, so I produced a checklist, downloadable from the link below.
{phocadownload view=file|id=5|target=s}