The key changes needed are to isolate the frog from the closure (inner) rails, and to wire the closure rails to the stock (outer) rails. The frog area is then electrically separate, and needs to be fed with switched power: it will no longer collect power via the point blades. The only difference I've made is to isolate the closure rails a bit further back from the frog: this reduces the likelihood of "back to back" shorts.
The quickest way to explain this is with pictures:
|
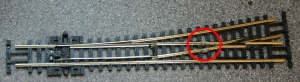
Cut the two closure rails leading to the frog. I used a "Dremel" power tool with 1" diameter cutting disc. Be careful - in N gauge the disc will nearly touch the outer rails by the time it has cut to the bottom of the rail, and it will kick! |
 |
|
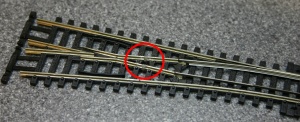
Add filler to the gap. I have used Araldite: it is hard when set, so hopefully will not be eroded by rolling stock. It is difficult to work with though - very stringy. |
 |
|
After the glue has set, it needs to be shaped to the contour of the rails; I simply used a scalpel. |
 |
|
Finally the bond wires need to be added. I've used 22SWG tinned copper wire, and 60%/40% tin/lead solder. Lead free solder did NOT flow well. Do the soldering very quickly (aim for a second or less) to avoid heating the plastic. |
 |
Sounds fiddly? Well it is the first time - but do them in batches and they'll be done in no time.